Saturday, March 28, 2020

HOTT 52 - Battle 5 - A Final Desperate Battle

Battle 5 was fought over the weekend. The more I play, the more that setup finishes more quickly, and I remember the combat factors a lot more now. Less referring to the sheet and rules. However, each game finds me asking questions and I have a question from this week's battle below. But first, let's get to the action!

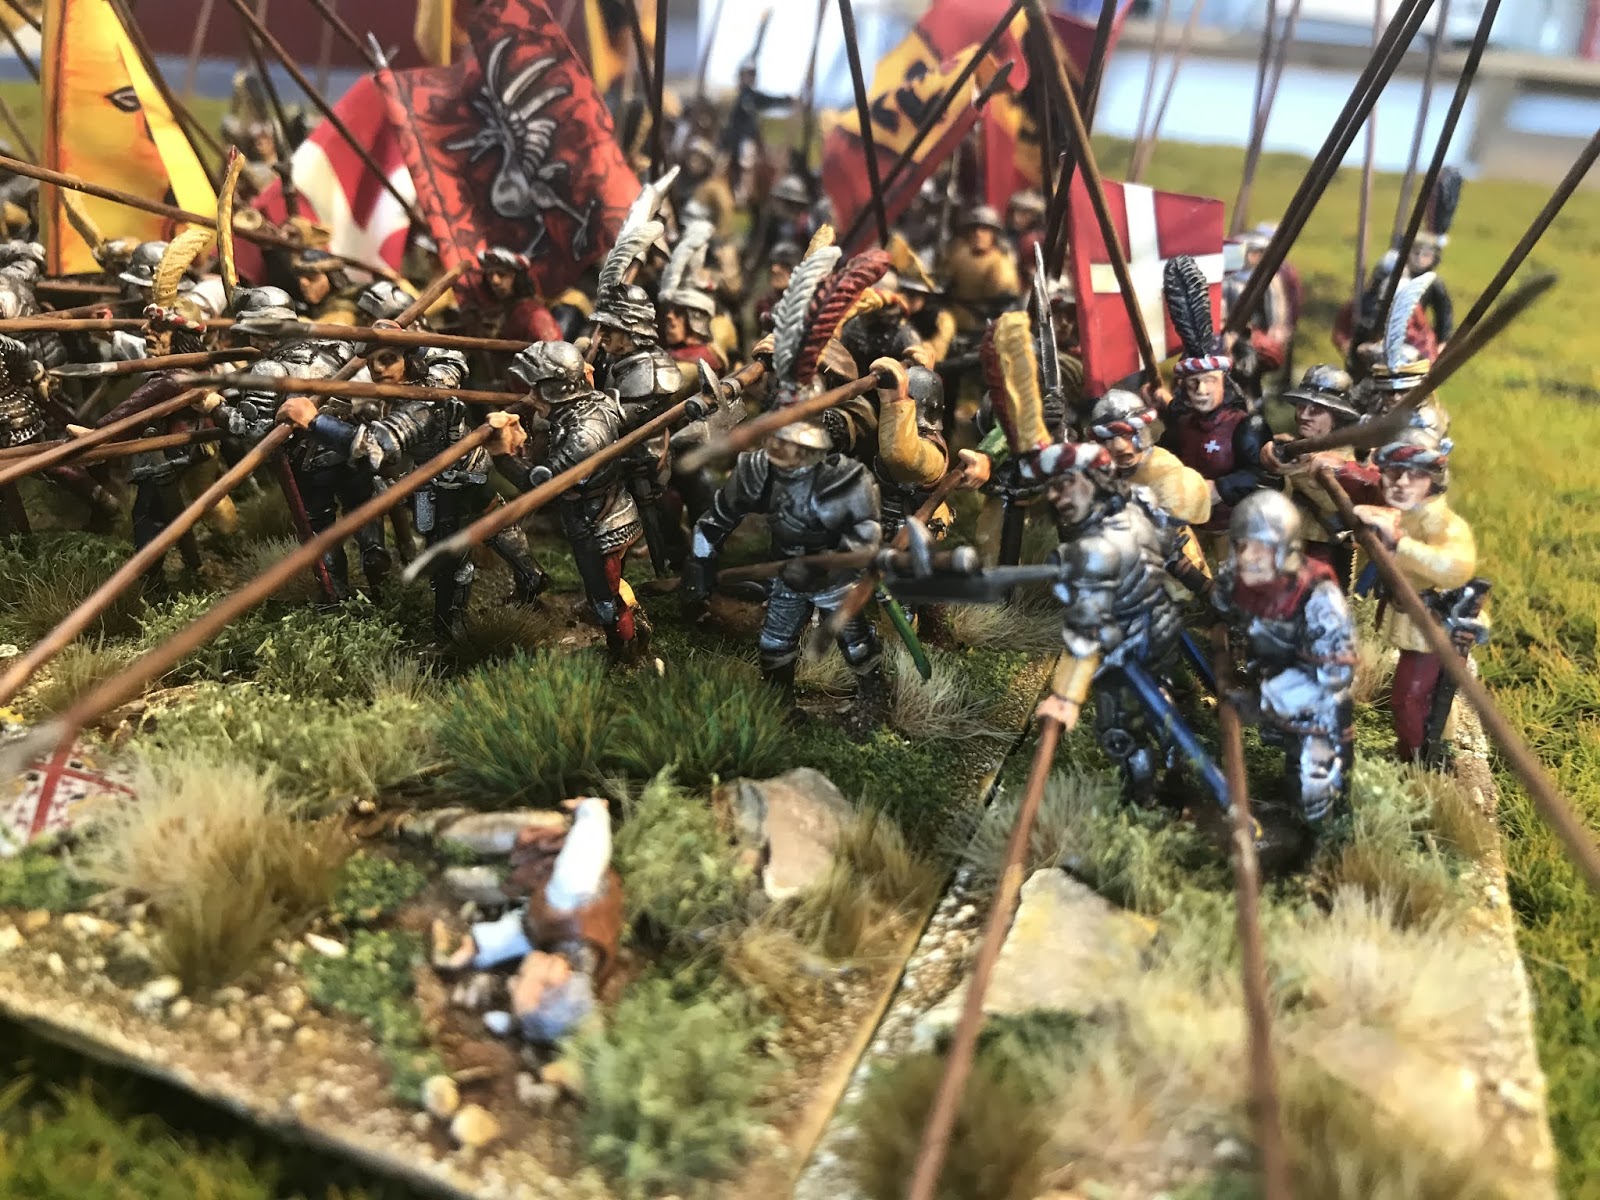
I generated both armies randomly. Both armies would consist of mostly militia and a few regular forces.

Humans
General - Sp x1
Spear (Sp) x3
Warband (Wb) x2   
Shooters (Sh) x4
Knight (Kn) x2
Orcs - defending
General - Wb x1
Warband (Wb) x3
Hordes (Hd) x2
Shooters (Sh) x3
Spear (Sp) x4

I thought about substituting fantasy elements (like Aerials, Magicians, Cleric, etc), but a toss of the dice said that wasn't happening.


I'm painting those Saxons as fast as I can to complete my Human warband elements. Hopefully they'll be done for next week's game! I don't like empty stands!

The Orc Warchief, Ib'Nuzgran, lines up his troops as a solid bunch.  He details a warband to remain behind in case the sneaky humans try to send a detachment down the road to sack their stronghold! The human commander, Major Nesbin, sees an opportunity and details his Knights to head down the road and see what trouble they can cause.


"Goblins to the front!" Ib'Nuzgran roars! The goblins rush ahead of the whip cracks from the orc sergeants, eager to taste human blood! Nesbin, seeing an opportunity to rain missile fire on the hordes, has his Shooters fold inwards as the goblins approach. The treacherous goblins then turn towards the wings, and Nesbin regretfully moves them back to keep the line intact.

Behind the goblins, the Bestials move forwards towards the approaching Human army.


The Human Shooters do their job, launching a hail of arrows on the exposed hordes. Their courage melts like snow in the sun and the goblins run away, ignoring the curses of the Orc sergeants. The lines draw close and then rush to attack! The Orc Warband drives through the Human lines, pushing their opponents back and pursuing with bloodlust!


Meanwhile, the Knights head down the road to see if they can sack the Orc stronghold. The warband left behind to guard it takes up a position in the woods near the road. The Knights are reluctant to take their hoses into the woods, so one element attempts to distract the Orcs while the other group of Knights attempts to swing around. Unfortunately, being so far away from their commander, it is hard to keep their attack organized! The Knight's attack falters as they delay in how to best approach the stronghold. (The distance is greater than 600p to their commander and the Kn are behind an impassable hill with woods - it requires 2 PIPs to move each element, instead of 1. With the battle focus on the line, as you'll see below, this is as far as the Kn got. If only the humans had a couple of better PIP rolls...)


The battle's momentum swings towards the Bestials as the Human attackers are pushed back or destroyed! However, the impetuous Orc Warchief breaks off from supporting his warband to attack the nearby Human Shooters. Recoiling from the Human's counterattack, the Orc Warlord finds himself behind the other Orc Warband, out of position should the Warband be forced to recoil! Lucky for Orcs, the warband fights on.

It turns grim for the humans. Only a Blade, the Majorand his command of Spears, and two Warbands remain of the line of Human attackers! The Bestials line is mostly intact and howling for human blood!


Nesmith sees an opportunity, however, and orders a desperate charge! The warbands and shooters surround the Orc Warchief and press the attack. The Warchief falls! The Bestials, disorganized and demoralized, retreat from the battle and their encampment. (6v1 in favor of the humans almost always guarantees a victory, as it did in this case. The odds were good for the humans for this bound, but had it not gone well, the Orcs were looking well on the way to victory.)

Humans win versus Bestials (Orcs/Goblins) (8 - 10G)

The Orc General didn't have many options when his surrounding elements were defeated, leaving him exposed. It was a close battle and with the Human line as wrecked as it was, there were going to be a lot of overlap situations when the lines closed again.

So my question came about with regards to when one element moves into contact with an enemy. For those of you who don't play HOTT/DBA (Hordes of the Things game is derived from the historical wargame De Bellus Antiquitatus), how elements contact each other and then "conform" (line up so that the elements are square with each other) is a whole set of precise rules - written in what is known as "Barkerese"! For comparison, the language (and organization) of 1st edition Advanced Dungeons & Dragons is similar to DBA/HOTT. 

My question came to who had to conform to whom, when a group contacts a group, and if supporting elements (elements in the 2nd rank that can add to the combat resolution of the elements in the front rank) also conformed. I ruled at the time in one way, but after a quick (and slightly embarrassing) newbie question/discussion posted to the HOTT Facebook group, I reread the rules and now I understand - when a group contacts a group, the conforming applies to the entire group, including supporting elements.

My shorthand for remember this is: Moving group conforms to standing group, single elements conform, otherwise, check the rules! It works for me... 

The other thing I (re)learned is that when moving through Bad Going, you move a group as a single column, or if you want to keep a line, those elements in Bad Going move as individual elements. It didn't come up this game, but has happened in previous games and I had forgotten that.

That's what I'm really enjoying, is this relearning and learning of little bits and elements. It feels just like AD&D/OD&D in that regards, and that just makes me happy.

On to Battle #6 next week!

Warlord Germans...I Had No Idea....


Warlord infantry section

After years of slagging off 28mm WWII figures a combination of circumstances have led me to dip my toe in the water. To put it simply, I was pleasantly surprised, a lot of the figures I'd seen have been the late war, overly "heroic" (read: Fugly) style, which remain pretty horrible. Then I discovered these early war Warlord plastics, much different, presumably a different designer, nicely proportioned, and as with so many plastics these days, really cleverly designed in terms of pose compatibility within the sprues. I enjoyed putting together the plastics, took me back to the old Airfix multi-pose kits (remember them?)  they fit together well, and have some cracking pose combinations.
Then the painting, great fun...a lot more to work with obviously than 20mm, and the overall design lends it to gaining a decent result with only moderate skill with modern paints and techniques.
These I did with Vallejo block painting, then slopping GW Nuln oil all over, then a 2 layer highlight, before doing the flesh last (Vallejo sunny skin with a Lavado skin wash), my usual old lazy basing of PVA and sand +Army Painter Autumn tufts.
I'll talk about the Stugs a bit later.
All this is for Chain of Command, I've found a group in London who play these terrific rules, so this lot will get their first outing next week. However, I have far grander plans for this lot in the future. 
More to come! 

So, You Want A Revolution? Well.....

Things are heating up. Well, the melting pot got hot anyway and my new mould was tried out and now I've assembled a few prototypes.


Left to right, primed figures only:

Republican French:
Prince August SYW Prussian infantry with Modified Meisterzinn bicorne.
PA SYW Russian infantry with one of my original 'Tarleton' helmet heads.
General: PA SYW Dragoon officer w MM bicorne.

Allies:
Emigre: Meisterzinn infantry with my original Roundhat.
British: PA SYW Prussian with gaiter tops filed off and MM bicorne.

Today was the first time I've  managed to get an entire Dragoon out of the new mould. I still can't get the officer's sword to cast but did get the dragoon's sword to come out and that's good enough. I only managed three useable dragoons plus three whole or salvageable officers so just need two more dragoons before the Scots Greys will be ready to join the queue. Its a pity they traded in their bearskins for bicornes for this campaign but then, I have a bicorne mould but none for a 1795 Scots Grey bearskin, so, just as well. 

Got some work to do! 


Monday, March 23, 2020

A New Direction On An Old Road


Bern front ranks
In the early 1980s, I, like many others were enormously inspired by the pictures in the early editions of Miniature Wargames of Peter Gilder's Italian Wars collection and the accompanying range of figures he did for Connoisseur. 
I bought and painted them- a couple of Swiss pike blocks, a few Gendarmes and handgunners etc. Not a lot but enough for a few games with my mates Spanish using the great George Gush rules. Anyway, I think they were sold in the late 80s but I've always had a fondness for the armies. 
So last year I thought I'd revisit the period, using the more modern and fabulous Perry metal and plastic ranges alongside some still really terrific Foundry figures (which date from the late 80s iirc).
I've even shoe-horned in a few of the better old Connoisseur figures for old times sake. 
On top of this there are some superb figures available from Steel Fist miniatures and good old Front Rank has a few offerings.
So far I've accumulated a decent little Burgundian army and I'll feature those in some later postings but to start with I'll show a few pictures of the first 2 Swiss blocks I've completed.

Uri and Bern
 The intention with these was to make some dynamic looking units. I get a bit bored with units of purely upright pike. Yes, I fully appreciate their practicality but I'm starting to reach an age where I'd sooner do stuff I really like and thinks looks good than feel constrained by practicality! Plus in the aforementioned ranges there are some great figures.
Uri:
So, the nitty-gritty. I've gone for blocks of 48 - 6 wide, and 8 deep to give a beefy look. For the Swiss I'll be doing 6 of these (although this might, might turn into 12!) to allow them to be used as 3 x96 figure units which should truly look the part.
They are based theoretically on 20mm x 20mm per figure in a minimum of 4s with some more larger multiples. I have ordered a few big movement trays but I'm not sure if I'll use them, we'll see. Obviously there is an overhang of 40mm at the front of the unit to accommodate the pikes, this also allows a bit of battlefield detritus and casualty figures to enhance the look. The bases are my tried and tested sand/glue oil paint style with lots of Army Painter tufts and bit of flock.
The figures are a real mix, and I've taken advantage of the Perry's who do extra Swiss heads for their plastic ranges. Steel Fist also do a set of 4 amazing armoured front-rankers with beautiful separate heads, so these have been swapped in with the plastic stuff for more variation

Uri and Bern 
The flags are mostly from Pete's Flags on e-bay and the lovely Flags of War range. I'm going with 4 flags per block so they really stand out.


Bern
So, that's the bare bones of how I'm approaching this project, I'll put in more details as I add to this blog when I can give you more Swiss, the already completed Burgundians, before moving on to the Italians and Landsknechts.


Other Swiss blocks planned will be "red/white combination (Zurich and Schwyz) and a blue/white and black and white pair (Fribourg and Lucerne).


Friday, March 20, 2020

VC 1012, M.A.D.!

What, me worry? Not when I have M.A.D. from U.S.Games as this episode's game! Hoo boy. I hope you enjoy the episode. Next up is Robin Hood by Xonox. If you have any feedback for that game, please send it to me at 2600gamebygame@gmail.com by March 8th. Thanks so much for listening!

M.A.D. on Random Terrain
John Hall's website
Interview with John Hall by Sean Fitzgerald 
No Swear Gamer 426 - M.A.D.
No Swear Gamer M.A.D. gameplay footage
Get Matt's Repro Freeway patch on eBay

Thursday, March 19, 2020

Crysis 2


System Requirements


OS: XP/Vista/Windows 7
CPU: Intel Core 2 Duo with 2Ghz, AMD Athlon 64 x2 2Ghz
RAM: 2 GB 
HDD: 9 GB
GPU: NVidia 8800GT 512Mb RAM, ATI 3850HD 512Mb RAM

Download The Game Here


Recent Questions Answered.


What is Mind Sports South Africa?
  • Mind Sports South Africa (MSSA) is a non-profit association that is the recognised national federation for board games, eSports, robotics and wargames. The MSSA is run purely by volunteers who are elected by the different member clubs at the Annual General Meeting. The Annual General Meeting is always held at the South African National Championships. As the recognised controlling body, the MSSA is the only authority for its codes in South Africa and is the only body that may legally award provincial and national colours. Thus it is the only body that can legally select teams to represent South Africa in international competition.
What is the MSSA Inter-school league?
  • The league is designed to legally bring competitive esports into the school environment, in which schools pit their best players against other schools in order to determine the best school in the country as done for waterpolo, swimming, etc.
How does someone get their national colours for esports?
  • In order to get national colours for gaming, the gamer must first and foremost be registered as a member of a member club. Then, the gamer must participate in an accredited MSSA eSports event. However, participation alone is not enough. The gamer (and his team) must then finish in the top three, or the top twenty percent of teams in such event. Thus if there are six teams competing, the teams that finish in first, second and third places will qualify for trials. If there are twenty teams participating, then the top four will qualify, and if there are fifty teams participating, then the top ten will qualify for trials. When the Management Board has agreed to hold trials, all gamers who have so qualified are invited to participate. Then it it is at such Trials – which is always a LAN – that the team is selected.
How are the official games determined?
  • The member clubs of the MSSA are responsible for choosing the games to be played at all MSSA events on an annual basis. The way in which this is done, is that the games choice comes up for review by the cub-committee, and all member clubs are requested to furnish their choices. Of course the Management Board may add additional games if they are required by the international federation.
What are the most popular esports games locally?
  • Popularity of the games in general can only be answered by the publishers and the retailers. That is not what the MSSA looks at. The MSSA concentrates on competitive gaming and providing an outlet for competitive gamers. Thus, there may be a game that is fantastically popular among the gaming community, but because the game may not lend itself to competitive gaming, the MSSA may not cater for it. 
How has console gaming grown in the country in terms of esports?
  • Console gaming has a number of advantages in terms of esports. Because of its ease of access, lower cost, and standard systems, it has brought gaming to many who do not have the finances for computer gaming, and to many who do not have the know-how in terms of computer gaming. To start console gaming, all the gamer needs to do is 'plug and play'. Thus console gaming has made huge strides in attracting many new gamers to competitive esports who otherwise would have felt intimidated by the set up procedure. In the past three years, numbers of console gamers participating at MSSA events have doubled.
What's the best way to become a professional gamer in South Africa?
  • In order to become a professional gamer, my advice is to start while you are in school. The gamer must first develop a passion for the game and for competing while, at the same time learning to be part of a team. It is important for gamers to then train properly for the game. Simply playing does not equate to training. Training involves examining every aspect of the game and pushing it to the nth degree. Remember, that mistakes made in practice are often carried through into competition matches. Thus it is important to practice perfectly.... Once a gamer has earned provincial and national colours, the gamer would have been exposed to the international circuit. It is then that the gamer is ready to start thinking about becoming a professional. However, to be a professional, the gamer needs solid sponsorships and needs to be part of a team of like-minded individuals. Often the professional gamer will have to put gaming above all else in order to secure any form of sustainability as a professional gamer. It should be noted that the professional gamer would also have to register with the tax authorities as a professional as any income derived while being a professional would be taxed in his/her hands. Of course, any expenses directly related to conducting himself as a professional gamer would then also be able to be deducted.
Why the decision to send players to IeSF and not to other privately owned events?
  • For a start the costs involved are very different, but so are the visions off the privately owned events and IESF. The privately owned events belong to companies that are essentially in business to make a profit. On the other hand, IESF is an association not for gain that is attempting to get esports recognised as a fully-fledged sport. IESF is trying to get esports accepted by the highest authorities in international sport. As an association, all member federations are responsible for the running of IESF and making the decisions that will determine the future of both the IESF and of esports in general.  Thus IESF is more in line with the MSSA's own objectives, and the MSSA has a vested interest in making IESF work. However, that is not to say that the MSSA will not send a team to the other events if it can afford to do so. 
Also read:

Dona Nobis Pacem And Final Fantasy X

At Holy Mass as the priest holds the Sacred Host in His Hand, he strikes his breast three times saying-

Lamb of God Who takes away the sins of the world, Have mercy on us
Lamb of God Who takes away the sins of the world, grant us peace

This moment occurs just after Sacred Host is broken, one of the moment which mystically shows forth the Sacrifice Our Lord offers on the Cross and that His perfect sacrifice has been accepted to grant us peace- peace between humanity and Almighty God in the New and Everlasting Covenant. 

Holy Mass renews this sacrifice it brings this Once and For all sacrifice into the here and now, God uses the rites of the Mass to intersect history anew with this One Sacrifice, bringing its efficacy, applying its merits to those who are present and who have interiorly united themselves to the sacred rites.

He does this through His Sacred Priesthood- those to Whom He Himself gave the command, 

"Take this, all of you, and eat of it, for this is My Body which will be given up for you- do this as a memorial of Me", a sacred rites, through which, according to St. Paul, "you are proclaiming the Lord's death, until He comes".

This brings me to the thought, which I have shared previously, about "the calm" of Final Fantasy X.

When the final summon is made, when the summoner gives his/her life in sacrifice, sin is defeated, the evil monster is chained up once more, and a period of peace is given to the world.

Let's skip the fact that as the plot of FFX develops the whole Yevon religion is revealed to be a sham, but the fact of the matter is, the final summonings did bring calm, and this was because of the self-less courage of the summoners.

Here is the extract from X about The Calm, only watch the first 5 mins, after that it moves on. 


Notice the desire for this Calm that the people have, and the language used, it is the period of peace during which people can raise their families without fear. The calm that parents long for the safety of their children, and children so they can be free from nightmares and sleep peacefully in their beds.

Maybe we need to try and see the Sacrifice of the Mass like this- in attending Holy Mass, in being there at this Have Mercy on us! Have Mercy on us! Grant us peace! The period of calm is ushered in to our lives, it envelops us, we are surrounded in Our Lord's merits mediated through the Holy Sacrifice- the Final Summoning. 

This doesn't mean we won't suffer from illness, it doesn't mean endless prosperity, but neither did the final summoning in X, but what it means is freedom from sin, from the power of the Devil, and for those who are living in the state of grace, the promise of Eternal Calm, of which this present time will just be a foreshadowing.

With these thoughts in mind-- Introeamus ad altare Dei.


Monday, March 16, 2020

Suzy Cube Update: June 1, 2018

#SuzyCube #gamedev #indiedev #madewithunity @NoodlecakeGames 
What a week!! We are continuing to work hard to wrap things up in time for *redacted*. 
Read more »

Sunday, March 15, 2020

Curved Region Rendering

Around a month ago I had an idea in my head: a voronoi grid modified to have rounded cells that change in size. I made an attempt here for single cells changing size. The next step was to merge cells together, as I had done on this project. I decided that the way to demo this would be to simulate some kind of belief/cultural systems that spread over time across a map. I tried this here.

Screenshot of influence map experiment
Simulation

It didn't go well.

What happened? I think the problem was that I had three unknown elements in this project:

  1. Simulation with the simplest rendering code I could get away with. Figure out what simulation rules are interesting and cool.
  2. Rendering isolines on a triangle mesh.
    Isoline on triangle
  3. Rendering curved isolines on a triangle mesh, using Bezier curves.
    Bezier isoline on triangle

In trying to figure out all three at once, I didn't do a good job on them. I should have instead focused on one at a time. I ended up succeeding with #2 when I learned about and implemented the Meandering Triangles algorithm, and also built a little interactive visualization that helped me understand how the algorithm works. I failed with #1, having tried several algorithms but not finding one that I liked. I realized towards the end of the week that #1 was a red herring; I didn't need a simulation at all, as I really just wanted curved regions. I also failed at #3, having tried some experiments but never finding what I wanted, and also rejecting Chaikin Curves for reasons I can't remember. Since I really wanted the curved variable sized regions, I should have spent more time on #3 and less on #1. I ran out of time on this project so I'll leave #1 and #3 for another day.

You can see the animation I ended up with.

What do I mean "I ran out of time"? That's the next blog post!

Thursday, March 05, 2020

Testing Esoteric Lists: Gunny & Madrak2


Last night I was able to get an astounding two games in and as I was heading to my FLGS I decided I didn't want to just run the popular pairing of Madrak1 and Borka2, mainly because I've played a ton of Madrak1 already and while Borka2 is fairly new for me I have had a few rounds with him already.  I just wanted to try some lists that were of my own design that I thought were interesting and possibly strong.

So in I went with a "pairing" to put down into whoever I was playing against: Gunnbjorn and Madrak2.

I'll tackle each list and the match up in turn.

Gunny 

Trollblood - Gunny Goes North

Theme: Storm of the North
2 / 2 Free Cards     75 / 75 Army

Captain Gunnbjorn - WB: +28
-    Trollkin Runebearer - PC: 0
-    Dozer & Smigg - PC: 18 (Battlegroup Points Used: 18)
-    Dire Troll Bomber - PC: 19 (Battlegroup Points Used: 10)
-    Dire Troll Mauler - PC: 15

Hearthgut Hooch Hauler - PC: 18

Bog Trog Mist Speaker - PC: 4
Valka Curseborn, Chieftain of the North - PC: 0

Krielstone Bearer & Stone Scribes - Leader & 5 Grunts: 9
-    Stone Scribe Elder - PC: 3
Northkin Raiders - Leader & 9 Grunts: 15
Swamp Gobber Bellows Crew - Leader & 1 Grunt: 2

I was really excited about this list since it seems like it can clear a lot of infantry off the board or shoot a heavy off the table.  I've been dying to find a way to make the module of Hauler + Raiders work, and I feel giving them Snipe via Gunny or Grim2 is the way to really make them shine.

I put this pair up vs. my friend Brian who was coming back to playing Khador after 8 months of playing Circle and a lot of other games.  He had Butcher3 with Jacks Galore and a Zerkova 2 list with lots of Greylords and a smattering of Doom Reavers.  I really wanted to try Gunny and on discussion of the matchup it was clear that Zerkova 2 would get shot down pretty hard on the approach before she could really do any damage, plus most of my army is going to be Cold Immune, meaning he had to drop Butcher.  Madrak is probably the better Butcher3 drop, but I wanted to see how Gunny would match up.

Brian's list from memory was roughly:

Butcher 3
-Wardog
-Berserker
-Berserker
-Ruin
-Grolar

Forgeseer
-Behemoth

Forgeseer

Eliminators
Eliminators
Mechanics 

Brian won the roll off and elected to go first.  Scenario was Outlast.

After running his army into position up the field on turn 1, I replied by feating early to avoid the Behemoth clearing out swathes of my Raiders and running to be just out of Brian's threat ranges.

Thanks to Dozer's animus I was able to get lucky drifts/boosts onto one member of each unit of Eliminators and take their gang bonus off the table.  Still I was being a bit too timid by staying out of his threat ranges and I had blocked up my Hooch Hauler behind my Raiders making the order of activation awkward on this and the following turns.

On Brian's second turn he simply positions to threaten the entire zone and moves Butcher on to the central flag on his side. He moves Ruin into some rough ground for cover and positions both Argus centrally to threaten as well. 


On my second turn I decide that Ruin and both of the Argus must die to take away relentless charge from Butcher so I can use Rockwall to try and control him plus the drags.
 
I'm able to kill both Ruin and the Argus, but it takes literally everything my army has to do it with. I made a mistake and failed to contest Brian's flag and we both go up a point.  I use a Rockwall to prevent Butcher from being able to charge/move+impending doom any of my heavies in, so Brian elects to keep him on the flag for the turn and merely runs or sends in what Jacks he can to jam me up.  He does clear one zone and manages to score it however. Still, far too much of his force is out of threat ranges and his ranged attacks don't do too much work on the Raiders. 

At this point we start doing trades, and I'm able to tie the score on CP's, but I make a mistake with Gunny and move him too far forward to where he is in danger of the Butcher and I forgot to cast my Rockwall. I do end up decently ahead on Attrition, though Butcher can swing things back around had Brian not gone for an assassination. 

Sadly for Brian his dice manage to fail him completely and Butcher is left engaged with a Bomber and Gunny in melee and concedes based on the fact that Butcher has zero camp and will likely get splattered. 

In hindsight I should have lost this game on two fronts: First the assassination should have worked as a punish for my mistake, and second if Brian was simply more aggressive just running literally every Jack at my list, I don't think I'm able to effectively trade pieces and take what is necessary before the Butcher can come in and remove all threats to himself and then just seal the game from there. I'm sure if this wasn't his first game with Khador in 8 months I'd have been splattered pretty handily.

While I think the list seemed great on paper, it doesn't bring a lot of bodies to the game. Perhaps my feelings are colored by the matchup being bad overall and with better placement of the Raiders and Hauler I would have more game against other lists on the same scenario, but this will require testing and a skeptical eye to see how things are.


Madrak2
 
Trollblood - Madrak2 Toughallo

Theme: Band of Heroes
3 / 3 Free Cards     74 / 75 Army

Madrak Ironhide, World Ender - WB: +28
-    Trollkin Runebearer - PC: 0
-    Dire Troll Mauler - PC: 15 (Battlegroup Points Used: 15)
-    Dire Troll Bomber - PC: 19 (Battlegroup Points Used: 13)

Fell Caller Hero - PC: 0
Eilish Garrity, the Occultist - PC: 5

Krielstone Bearer & Stone Scribes - Leader & 5 Grunts: 9
-    Stone Scribe Elder - PC: 3
Trollkin Long Riders - Leader & 4 Grunts: 20
Kriel Warriors - Leader & 9 Grunts: 11

I was/am really excited about this Madrak2 list. My initial thoughts with the caster is to pretend I'm a MK2 Cryx player and jam in 2x Fennblades + 2x Kriel Warriors + solos and run screaming at my opponent.

Then I got to thinking about how while other warlocks can deliver units like the Long Riders, a unit I absolutely adore, no one really makes them hit any harder and while they're very strong, they're not going to just blow up a heavy without any buffs.  Plus the problem with a 40+ dude infantry swarm with Madrak2 is it lacks basically any relevant guns and it's not very hard for enemy shooting to continually clear off my infantry. Once the Fennblades have been hit, the Kriel Warriors will get out paced and likely shot up pretty hard.  This would turn things into a game of "Who won to go first".

With the Long Riders I should still be able to chew through enemy models and also withstand enough shooting to do serious damage once the lines meet.  Initially the list had two units of Kriel Warriors to back up the Long Riders, but I decided the list was susceptible to control and I threw Ellish in. With the extra points I upgraded my Earthborn to a Bomber to get some ranged presence which I really found to be helpful. 

I played this list into Sean, someone who I've met but haven't played against.  He dropped Skarre1 Dark Host into me:

Skarre1
-Scarlock
-Inflictor
-Stalker
-Stalker

Wraith Engine

Bane Riders
Bane Knights
Min Bane Warriors + CA

Darragh
Necrotech
Tartarus

Scenario was Standoff and Sean won the roll to go first.

This game ended up being a bit of a back and forth with some key positioning elements due to equivalent threat ranges on our Cav and my spacing models out properly to avoid a Stalker being able to kill multiple Long Riders without issue.

I won the game in the end, but part of that could have been due to the fact that Sean had deployed Darragh with the infantry units on the flank opposite the Bane Riders, so we shared a threat range rather than him having an advantage.  He also apparently didn't know that Long Riders could slam models, and so I was able to eliminate all of his Bane Riders in exchange for sacrificing only one of my Long Riders.  It should be noted that Blood Fury'd Bull Rush slams, when knocking the slam target into another model or terrain is very strong.   Still Sean was very careful to only feed me feated on Bane Knights for my feat turn, and spaced appropriately with his other units in reserve to prevent me from getting too far ahead on attrition. I suspect if we played again this game would be much tougher and far more favored to the player who wins the roll to go first based on how each of our lists were designed.

I know I could play this list in Storm of the North to get extra speed on my units, but I think having Band of Heroes for the extra 2" and Takedown/RFP is absolutely crucial in the meta ATM.  Right now Trolls are balanced in that we can either speed up our Long Riders or we can buff their damage, but we can't do both. I do think the unit has a lot of untapped potential, and since I own two units of them now, I want to experiment a lot with them.

Conclusions

After both games I am more optimistic about Madrak2's list than I am about Gunny.  I am not sure how I feel about leading with my Cav up front, but I do know that making Long Riders weapon masters makes it so that they can easily kill any heavy on the charge with the usual amount that can get into one via positioning rather than not.  They also are fairly well positioned to be able to handle infantry due to Bull Rush.

As for Gunny, I think he just needs more testing. It may well be that what I have is sufficient, but man does it ever feel like having just more units to be able to throw into zones is the way to go.  Melee also just feels much stronger than guns at being able to do what is necessary: Jam up and piece trade, so as to allow Trolls the ability to play the Attrition game we're supposed to be very good at.  Guns still have a lot of value, but it's more about being able to snipe out a key model in a zone or scalpel out an important support solo or CA/WA/etc.

Still, I really want to find a way to make the Hauler + Raider package work well, it just seems like it should be so good on paper. I believe Grim2 is the next place to look with them, but I'm having trouble rounding out a SotN list that I like that includes that module.